How to Automate iOS Application Using Appium?
Appium is an open source and cross-platform tool. Appium supports the android as well as iOS applications. Appium is a good mobile automation testing tools. We can automate the scripts in six languages as Java, Ruby, Python, PHP, JavaScript, and C#. With the help of jar files, we can automate the mobile application. Appium Supports iOS application also. We can automate the iOS application using Appium.
As we have seen automation of android application using Appium. Now we are going to see How to Automate iOS application using Appium with java language. To run the iOS application we need a Mac operating system as well as Xcode version mandatory.
Pre-requisites – Appium : (Script for iOS Application)
- Java JDK installed with Java_Home
- Latest Xcode which includes iOS SDK and command line tool.
- Eclipse IDE for mac.
- Node js for mac.
- Android SDK tool for mac
- Apple’s XCUITest
- Jar files for appium – to get this go to the appium-java .
Installations:
Software required for setup of an Appium –
1.Java Application: JDK (Java SE Development Kit) – [ Compulsory ]
- Go to the link:
http://www.oracle.com/technetwork/java/javase/downloads/jdk8-downloads-2133151.html

- Install it.
- Once after installation is done, set the JAVA_HOME path.
- Export the JAVA_HOME path on mac.
2.Latest Xcode which includes iOS SDK.
- 1. To download Xcode. Go to the App Store and download Xcode.
- 2. To download and install the Xcode, we need Valid Apple ID and Password.
- 3. Accept the license and install it.

3.Eclipse IDE
- Go to the link of eclipse IDE. and download it.
- link – https://www.eclipse.org/downloads/

- After installation, now open the eclipse. We need TestNG software to run the test cases
- Go to Help –> install new software. add–> type name : TestNG

- Agree to the licenses and install it.
4.Node js
- Go to the link of Node.js and download it.
- link – https://nodejs.org/en/download/

5.Android SDK tool
- Go to the link of Android studio website and download it.
- link – https://developer.android.com/studio/
- Export the ANDROID_HOME path on mac.

6.Appium for mac [By this we can get the appium GUI]
- Go to the link of appium and download it.
- link – http://appium.io/
- Install it as per the operating system. As we are explaining for mac so, we will download the file as per the mac operating system.
- By the help of this, we can get the inbuilt inspector to find out the elements.

Steps to Install the Appium Tool –
In order to install it, we should go to the below steps:
- Step 1. Install the Java application.
- Step 2. Open a command prompt.
- Type the command: “node –v” (to check the node version. we will get the installed version of node)

- Step 3. Install Appium via NPM command.
- Type the command: “npm install -g appium”

- Step 4. After installation is done successfully. Check the version of installed appium.
- Type the command: “appium –v”

- Step 5. To start appium server
- Type the command: “appium”

We will get the appium version as well as the appium listener with the port number. This is useful to run an iOS application on the listening port successfully.
Some External dependencies of appium on Mac. [Important]
We have to install some dependencies for Appium on Mac. Follow the below link and do as per it.
Link :- https://github.com/appium/appium-xcuitest-driver
Steps to install external dependencies
- Go to the terminal
- Type Command: brew install libimobiledevice and install it.
- Type Command: brew install ideviceinstaller and install it.
- Type Command: brew install carthage and install it.
- Type Command: npm install -g ios-deploy and install it.
7.Apple’s XCUITest
To run the Appium script on Real iOS device we need WebDriver Agent. It is really important to run XCUITest using webdriver agent.
link : https://github.com/facebook/WebDriverAgent
Some Steps should be followed to run web driver agent for appium.
1.Open Terminal. Go to the folder:
cd /path/where/installed/lib/node_modules/appium/node_modules/appium-xcuitest-driver/WebDriverAgent
2.type command : “mkdir –p Resources/WebDriverAgent.bundle”
3. type command : “./Scripts/bootstrap.sh -d”
4.Now open the WebDriverAgent.xcodeproj in Xcode.
– After opening it we have to set “Automatically manage signing” for both WebDriverAgentLib and WebDriverAgentRunner.
– Go to WebDriverAgentLib –> Agent–> General –> Signing.
We have to provide the same singing certificate which has used for the IPA. To add certificate you should have valid Apple ID and IPA singing certificate.


- After that Build it. The build should be successful. After that, we can verify whether everything is working properly or not.
- Connect the iOS device and type the command in the terminal as :
Command : xcodebuild -project WebDriverAgent.xcodeproj -scheme WebDriverAgentRunner -destination ‘id=<udid>’ test // You have to mentioned udid of the device.
Steps to create the simple script for the iOS application.
Step 1. To create the project first open eclipse.
Go to File –> New –> Other –> Select Maven Project –>select simple project and workspace–> type groupid artifact id etc and click on finish.

We will get the project in eclipse on the left-hand side.
Step 2. Now we will get the pom.xml file.
Set the properties of Test-NG and appium in that file. Here we will mention the TestNG version and appium jar files java version.

Step 3. Then click on src/test/java to create the package.
Src/test/java –> new –> package. Here Name of the package: “appiumPackage”

Step 4. Now create a class in a created package
Right click –> new –> class
A]Type new class name.Once a class is created then we will get it as in the figure. This class will be used to create appium iOS driver for appium.
B] Now again create another class for Testcase execution. Here is the testcase class to run the test cases using appium.

Step 5. Now go to the src/test/resources –> copy and paste the .app file in that folder. To run the iOS application we need either .ipa file or .app file.
Right click–>new–>folder – Here we have to paste .app file / .ipa file

Step 6 .Type desired capabilities in the DemoClassForAppium.java
Here we need the code –
final File classpathRoot = new File(System.getProperty(“user.dir”));
final File appDir = new File(classpathRoot, “/src/test/resources/app/”);
final File app = new File(appDir, “yourappname.app”); // give the path of .app file/. ipa file .
DesiredCapabilities caps = new DesiredCapabilities();
caps.setCapability(“browserName”, “”);
caps.setCapability(“platform”, “iOS”); //Assign platform name of your application.
caps.setCapability(“deviceName”, “name of your device”); //Name of your device
caps.setCapability(“appPackage”, “package of your application”); //package of the application
caps.setCapability(“appActivity”, “activity of your application”); //app activity of the application
This is very important. We have to mention the URL of the Appium server.
driver = new IOSDriver(new URL(“http://0.0.0.0:4723/wd/hub”), caps);
Step 6 . Appium Inspector

By using this we can find the elements of the application. We can get the elements by resource-id, Xpath, accessibility id, text etc.
Example: Here I have given you the example for Accessibility id. You can get the elements by other ways also.
@Test(priority = 0) //(Always give the priority to test case)
public void sampleTest() throws InterruptedException{
System.out.println(“We launched the application succesfully”);
driver.findElement(MobileBy.AccessibilityId(“NO”)).click();
System.out.println(“We are able to click on NO button”);
Thread.sleep(100);
}
Steps 7. Before we run the application, we have to set build path by providing archive files to the project.
For this We have to Build Path–> Configure Build Path–>Libraries–> Add external Jars–> Apply and close.
Step 8. Once after done this, we have to run the application. To run the application we have to right click on the application. Select RunAs–> TestNG Test.
i]Before we have to do this step. We have to attach the android device by USB. And start the appium server.
Start Appium Server: A]If you are starting the appium server by terminal then we have type in terminal as : appium
B]If you are starting appium by GUI desktop. then open appium gui and start the server.
ii] Connect the real device to the system using data code and run the script using appium tool.
We can get the result of test cases on the console.
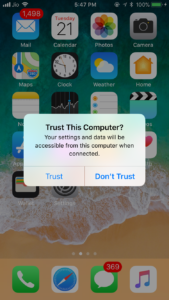
At the time of running the appium script, web driver agent successfully launched on the device for that will asks for trust this computer message. Always do Trust.

Once it has done it will launch the web driver agent as well as the application on the real device. We will get the output on the console.

In this above Article, I just explained how we can easily automate the iOS application using Appium Tool. Hope you all liked it. Thank You..!!!
You should take part in a contest for one of the best sites on the net.
I most certainly will recommend this blog!